Bring your Kaptivo back to life with ShareTheBoard

If you’re here, it means you know what Kaptivo is (or was) and you know that its cloud-based service is no longer supported. You’re also likely asking yourself, “is there a way to bring this camera I have mounted over my whiteboard back to life?” Well, you’ve come to the right place. Read on for lots of good news. The gist: odds are you can not only reanimate your Kaptivo using ShareTheBoard, you can upgrade it with jaw-dropping new features.

And if you’re unfamiliar with the concepts in the previous paragraph, check out this article to learn about Kaptivo, and how it compares to ShareTheBoard.

How to use Kaptivo with ShareTheBoard

We know you’re here for a specific reason, so let’s get straight to the point. Below are the three steps you need to complete, to breathe new life into your Kaptivo:

  1. Switch your Kaptivo to local mode
  2. Use live streaming software to turn your Kaptivo feed into a virtual camera
  3. Select that camera inside of ShareTheBoard

That’s all there is to it. Now let’s unpack each of these points.

Switch your Kaptivo to local mode

This is the hardest step of the process and the one that, unfortunately, we cannot directly influence. Your ability to complete this step may be dependent on the specific model of your Kaptivo device. But let’s not get ahead of ourselves; we promised good news, and that’s what we’ll deliver.

Your Kaptivo is, by default, set to share its feed over a cloud which, as you know, is no longer supported. Hitting the old link (kaptivo.live) just pulls up an error page. Most (?) Kaptivo devices, however, offer an alternative approach: serving their camera feed over a local connection. Here’s how to make that happen:

Step 0: Preparation

To make any of this work, you’ll need to make sure your Kaptivo is plugged in to both a power source and an ethernet connection. You’ll also need a computer connected to that same network. If possible, use a laptop. If you only have a desktop, you may also want to bring your smartphone along.

Step 1: Access your Kaptivo’s configuration panel

You have two options here: use WiFi or a static IP address

WiFi option:

  • Press and hold the button on your Kaptivo device (for about 10 seconds) until it starts blinking red and green.
  • Open the list of available WiFi networks on your laptop (or smartphone) and connect to the network called “Kaptivo – XXXXXX” (the X’s correspond to the 6 character code on your Kaptivo)
  • Using the laptop/smartphone, open a browser window and go to http://setup.kaptivo.live
  • This will bring up the login page to your configuration panel

Static IP address:

  • Your IT team may have already assigned a static IP address to your Kaptivo device. If so, ask them for the specific address and enter it into a browser connected to the same local network as the Kaptivo.
  • If you haven’t assigned a static IP address yet, you can do so yourself. You’ll need to log in to your router (see the router itself or its website for more information), then look for a list of devices discovered on your local network. After you find your Kaptivo device, you can assign a specific static IP address to it yourself. If the device is not easily recognizable, look for its MAC Address on the list of discovered devices (you’ll find the Kaptivo’s MAC Address printed on the back of the panel with the blue button). If you’re not sure how to do this part, try looking for videos about your specific router on YouTube.
  • After hitting your Kaptivo’s static IP address, you’ll see the device’s login page.
  • NOTE: If the above doesn’t work try going to kaptivo.com/setup. Then select ethernet… local host… and enter the IP address. If the Configure button still doesn’t activate, click on the “troubleshooting” message/popup and then click the link that reads “here” to bring up the device’s login page.

If neither of these methods succeed in bringing up the configuration panel login, please see the very end of this article for Troubleshooting suggestions.

Step 2: Log in to your Kaptivo

The factory default login is a username of “admin” and a password of “admin.” If you’ve changed this password, enter it here. If you can’t remember your password, reset your Kaptivo to restore its factory default settings.

Step 3: Switch to Local Mode

After logging in, you’ll want to locate the Device settings section. There you’ll want to switch the Operation Mode from “Cloud” to “Local Mode (Self-Hosted).” Next, save your settings and restart your Kaptivo (turn it off and on again), making sure to keep the browser window open.

Completing this step means your Kaptivo will now share its feed over your local, wired connection instead of attempting to share it through Kaptivo’s old cloud service. This means that only you (and any devices on your local network) will be able to see this feed on a specific, local IP address. That IP address will be visible after you log back in – right there in the first section (called “Overview”).

TIP: Bookmark this IP address. That will make it easy to access the feed from your Kaptivo in the future.

If you navigate to that IP address (on this local network), you’ll now see the old familiar starting point for a new Kaptivo session.

You will also likely see a message about your connection not being secured. Feel free to disregard this message – this is a direct result of enabling Kaptivo in local mode.

Enter your name and click VIEW BOARD.

Finally, click the blue button on your Kaptivo device. This will start your Kaptivo session and your board contents will be visible here in your browser (only on this local network connection).

Don’t have Local Mode?

Admittedly, we are not Kaptivo experts. We have, however, come across Kaptivo devices which simply do not offer the option to switch to Local Mode. You may, for example, see a message saying that this feature is only available to users on Kaptivo’s Enterprise Plan. Alas, this plan is no longer available, even if you wanted to pay for it. If this describes your situation then, to the best of our knowledge, this means that you will not be able to reanimate your Kaptivo after all.

But fear not! ShareTheBoard offers much more than Kaptivo ever did and, crucially, it works with any hardware. So, yes, you’ll need to replace your Kaptivo with a different camera. The good news: just about any camera you choose will work with ShareTheBoard, allowing you to successfully share your whiteboards with anyone on the planet.

And, to be completely fair, if you rely on your whiteboard, it might be more prudent to use hardware that is actually supported. While the method in this article will, indeed, extend the usefulness of your old Kaptivo, it won’t magically summon a support team if/when something goes wrong with your device. More importantly, there are a number of really great cameras out there – including whiteboard cameras, very similar to Kaptivo. If you’re looking for a recommendation, simply contact us or – better yet – book a free consultation to discuss all details live.

Turn your local Kaptivo feed into a virtual camera

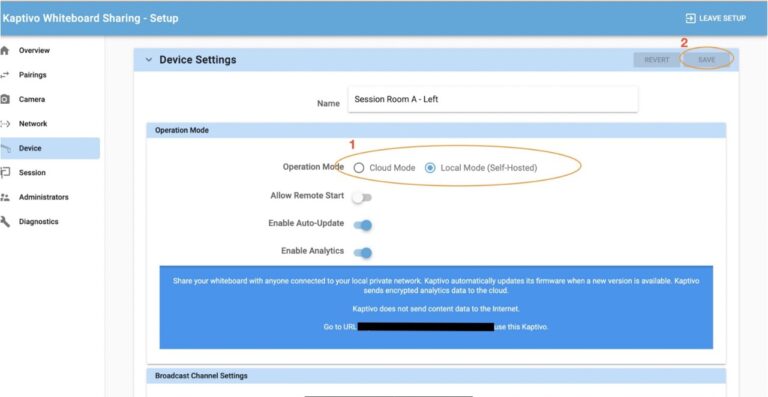
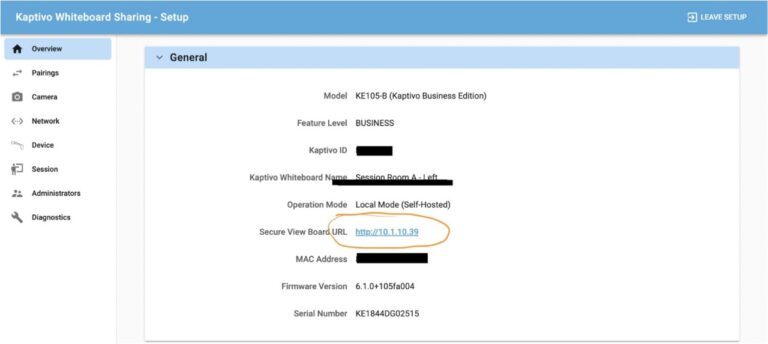
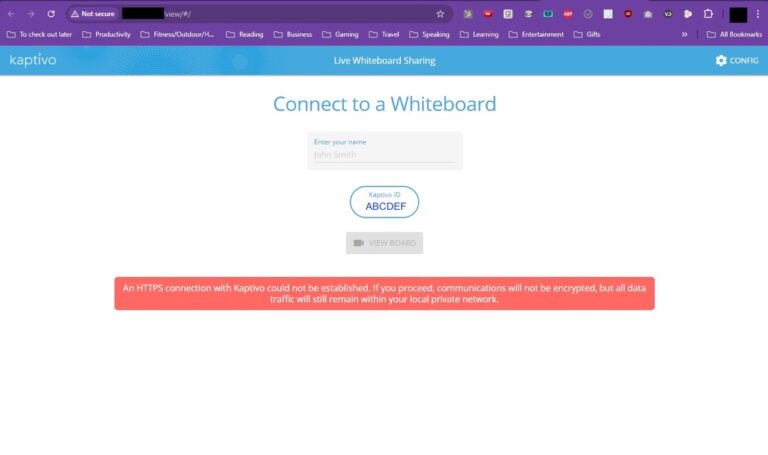
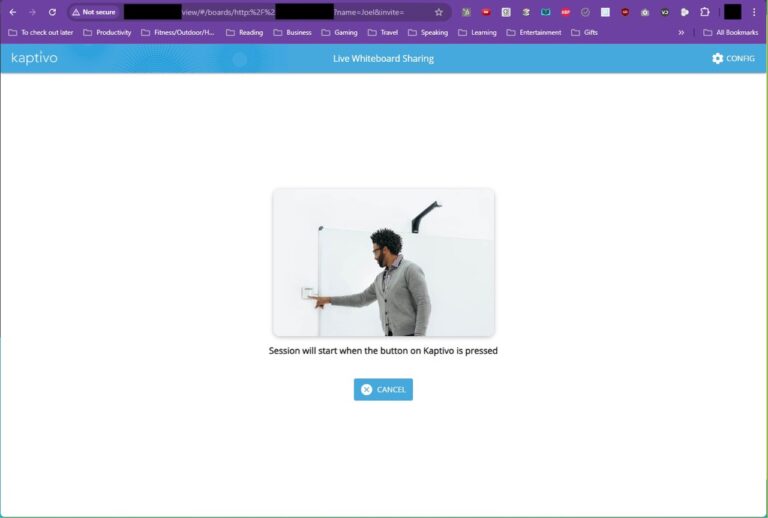
If you’ve succeeded in switching your Kaptivo to Local Mode, you’re well on your way to breathing new life back into it. Now, when visiting your Kaptivo’s IP address in a Web browser (over your local connection), you’ll see the feed from your old whiteboard camera. All that’s left to do is share it with the world.

You may be asking yourself: “So…. can’t I just use screen sharing on a video conference to show my remote colleagues this local feed?” And the answer, of course, is yes! This approach has some drawbacks however, as you’re simply showing a static image of your board contents and taking up your ability to screenshare in your session at the same time. By sharing your entire screen, you’re also limiting the size (and visibility) of the whiteboard you’re aiming to share.

Still, if your goal is to deliver at least some improvement in the visibility of your board and you have no need for saving its contents, transcribing its contents, making the board interactive, etc. then, congratulations, you’re done! If however, like us, you want your whiteboard to be a seamless participant in your broader workflow, please read on.

Step 1: Get streaming software

Right now, your Kaptivo feed is visible only to you. To share it with your remote colleagues in a fully interactive manner, you’ll need to somehow get it off of your local network. The easiest way to do this is using some free streaming software.

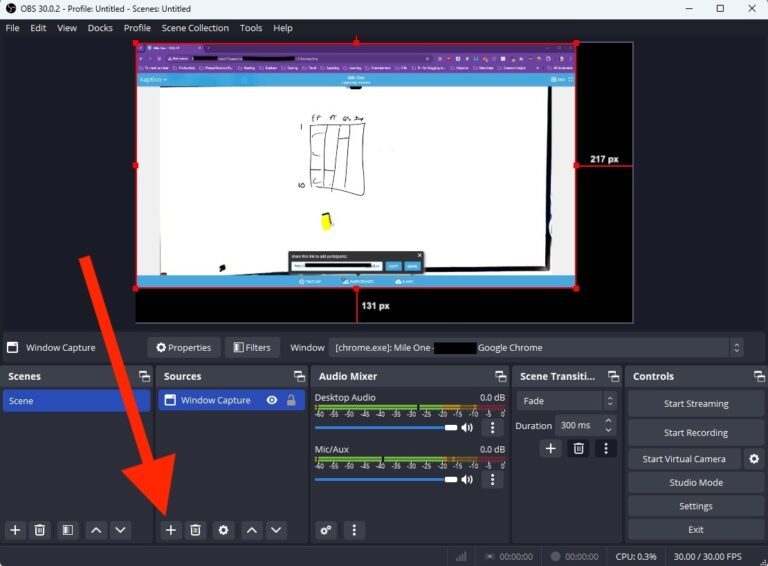
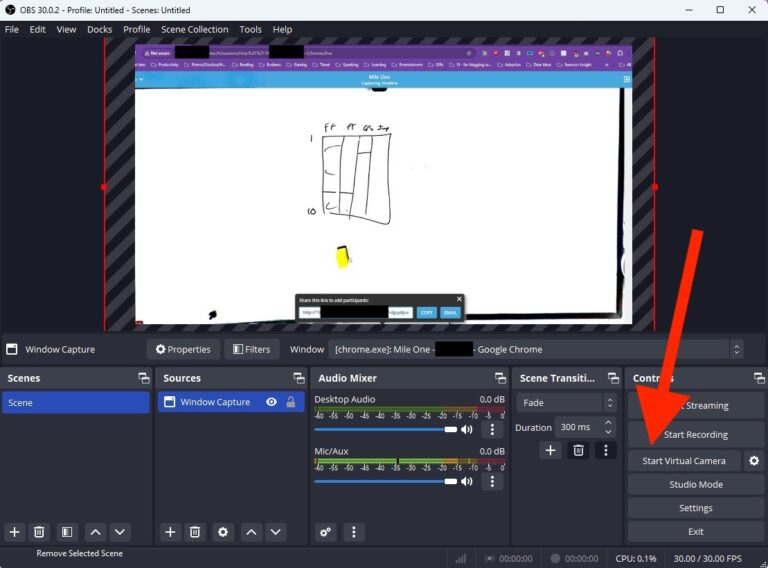
You can simply search for “live streaming apps” or “screencasting software” and you’ll quickly find that there are dozens out there. Many of them are even available for free, or at least offer a free trial period. Two such apps that we’ve seen work well are OBS (https://obsproject.com/) and SplitCam (https://splitcam.com/). Both of these are free and reasonably easy to use. We’ll use OBS in the example below but, again, there are dozens of good options out there.

Step 2: Add source/layer

After you download, install, and open OBS, the process of creating a virtual camera is fairly straightforward. First, locate the “+” sign in the section called Sources. Click the plus button, then choose “Window Capture.” Click OK, then select the window where your local Kaptivo feed is running and confirm your changes.

If you’re using SplitCam or other streaming software, there may be differences in names and options but the general idea is the same: Add a new “source” or “layer” and look for the option that will allow you to share a specific window.

TIP: Keep that Kaptivo feed in a separate window (i.e., not just a tab among many other tabs). This will make it harder to accidentally switch the source of your streamed contents.

After adding your new source/layer, you’ll see the window with your Kaptivo feed added to the primary canvas in OBS.

Stretch the image from that feed to take up the entire width of the canvas. Indeed, you may even decide to stretch it a bit further. Remember: ultimately, you just want to share the contents of your board most clearly, not just the screen on which the Kaptivo interface is visible. This is one of the benefits over simply using screen sharing after Step 1.

After you’ve stretched the image sufficiently, center it on the OBS canvas.

Step 3: Start Virtual Camera

In OBS, this is literally a click: there on the bottom right, click “Start Virtual Camera” – that’s it!

In some streaming apps, the virtual camera may even appear automatically as soon as you add a new media layer. In any case, by activating a virtual camera tied to the specific source/layer you’ve just selected, you’re effectively tricking your computer into treating your Kaptivo as a live, externally-facing camera feed.

Now, use that virtual camera in ShareTheBoard

This is the last step. It’s also the shortest and the sweetest.

To complete the process of using Kaptivo as an input to ShareTheBoard, all you have to do is select the virtual camera you just created. You can do this at the start of a new ShareTheBoard session or at any time during your session by clicking Settings and choosing the camera from that dropdown menu. If you’re using OBS, it’ll appear on the list as “OBS Virtual Camera.” Just select the camera and you’re good to go!

Now your whiteboard is not only visible: it’s interactive, it’s zoomable, it’s secure, it has memory and can even transcribe or analyze everything that you or your remote colleagues add to it! Just share your session’s unique Board View link with your colleagues and you’re off to the races.

TIP: Since your virtual camera is still likely showing parts of the browser window (in which your Kaptivo feed is visible), set the work area to focus only on the actual board. This will improve visibility even further and eliminate unnecessary noise for your remote attendees.

NOTE: You may notice a bit of degradation in the “cleanliness” of the board content captured via your Kaptivo, as the original image is now going through three applications. As of the time of this post’s publication, we are working on a new feature that will improve the legibility of content coming from Kaptivo devices. This will make the Kaptivo+ShareTheBoard combination even better. Stay tuned for an update!

After your initial session

The hardest step in this setup is the first one: setting your Kaptivo in local mode. Once you’ve completed that step, you no longer need to repeat it in later sessions. Just make sure you do not reboot or reset your device. Doing so will mean you’ll have to start the process over again.

Assuming you haven’t rebooted your Kaptivo, however, the process is quite simple:

  • Navigate to that local IP address assigned to your Kaptivo (see Step 1), sign in, and click on the device’s blue button
  • Open your streaming software, add a new source and identify the window running your Kaptivo session. Start the virtual camera.
  • Inside of ShareTheBoard, start a new session and select the Virtual Camera created by your streaming software

If you use your Kaptivo regularly, here are some tips to make the above a two- or even one-step process:

  • Consider leaving a dedicated browser window open to the IP address in Step 1
  • Consider leaving your streaming software (and virtual camera) on in the background
  • ShareTheBoard remembers your last selection, so you won’t need to reselect the virtual camera. Just start a new session!

Troubleshooting

Kaptivo and its cloud service are no longer supported. That means that there is no one to ask for guidance, no support team to assist us and, critically, no official user manual to consult.

With that in mind, it’s possible that you’ll get stuck – especially while working on Step 1 (Setting Kaptivo into Local Mode). Here are a few tips to consider:

  • When in doubt, reboot and reset! As with many IT-related issues, this maneuver seems to address a good percentage of bugs and speed bumps. Just remember, that when you reboot, you’re starting over: your Kaptivo’s username and address will likely return to their factory settings (admin/admin) and you may need to ask your IT team to help identify your Kaptivo’s local IP address.
  • Speaking of which: if you get stuck, talk to your IT team! Some of the steps in this process are tricky if you’re not an expert on routers, IP address, etc. To folks in the know, however, this is bread and butter.
  • If you see many artifacts/noise in ShareTheBoard after completing step three, also consider restarting the virtual camera (from Step 2) or the ShareTheBoard session itself. This can happen if you’re making adjustments to the layer/source inside of your streaming software and it too is best cleared up with a good old reset.
  • If you complete the process successfully and you’re unsatisfied with the quality of the content you see in your ShareTheBoard session, hang tight and check back in a couple of weeks. You may be experiencing the degradation described at the end of Step 3 above and there’s a good chance it’ll be fixed by a new feature coming very soon to STB.

Finally, even though we’re not Kaptivo experts ourselves, we’ll be happy to tell you everything we know. So, when all else fails, just sign up for a free consultation and we’ll troubleshoot together!

Acknowledgements

Many folks contributed to the creation of this article. Please allow us to thank them properly:

  • First and foremost, a BIG THANK YOU to Joel Swanson, Expert EOS Implementer, and founder of Mile One. None of this would be possible without Joel’s assistance and patience with our team. Joel is an avid whiteboard enthusiast and aficionado of whiteboard sharing technology. His expertise was essential in crafting this article. Thank you, Joel!
  • Another BIG THANK YOU goes out to the broad EOS Worldwide community, in general. Just like Joel, there are many talented Implementers here who rely on their whiteboards and who helped contribute to this treatise on reanimating Kaptivo cameras. Thank you, EOS Implementers!
  • Finally, a BIG THANK YOU to… YOU! This article come to life, ultimately, as many of you took the time to contact us, and share your questions and concerns. Through our shared efforts, we’ve concocted this how-to and hope that it is of good use to Kaptivo users worldwide.

Wrap up

Don’t let the length of this article fool you: extending the life of your Kaptivo really is a fairly easy task. In three steps, you can breathe life back into that whiteboard camera and teach it a whole host of new tricks.

Though it also bears repeating: if you’re responsible for your broader organization or if you rely on your whiteboards as much as we do, you should probably not put off replacing your Kaptivo forever. After all, if something goes wrong with your device, there will be no support team to contact…

If you would like a recommendation for a new whiteboard camera or would like to discuss any part of this article, please contact us or set up a free, live consultation to get started.

Happy whiteboarding!

See more articles

ARTICLE

What to Look for When Buying a Whiteboard for Your Home or Office

Learn what to consider when purchasing a whiteboard for your home or office. Explore tips on size, surface type, and features to enhance your workspace.

LEARN MORE

Cookie consent

Our website uses “cookies” to give you the best, most relevant experience. Using this website means you accept them. You can change which cookies are set in your browser settings, at any time. Find out more about our cookies.

X